
Every pro player started as a beginner, as do we.
When I first started shooting pool, I was terrible – but that is how everyone starts (even pro’s!). I barely knew how to hold a cue and I had a terrible bridge my friends would call the ‘Bear Claw’. The point is that with a few easy tips you’ll be able to elevate your pool game quickly. I know what it’s like to want to beat that one friend who always wins. These tips will also apply to players who are more intermediate because it brings you back to the basics.
If you develop your other pool skills without nailing down the basics, you are going to cripple yourself in the future. Example: I’ve met great players who have never mastered a good stroke and have had an improper jab stroke – and it limits how far their game can go. Unfortunately, it will be very hard for them to move up in APA until they reinvent their stroke.
Get that stroke down, solidify your pool stance and aim at the shot line properly.
1. Learn how to Aim properly
The most common question a beginner player will ask is “How do I hit the ball to make it go in?” The answer is easy – you need to find the point of contact for both your cue ball and the object ball you are going to hit.
- Cueball = white ball
- Object ball = pretty much all the other balls/the ball you are trying to hit the cue ball with
- Point of contact = where you precisely hitting the ball to make it go where you desire
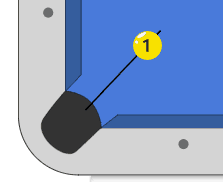
If you don’t know how to aim to make a shot – Pretend you are trying to pocket the yellow 1-ball. Imagine a line going straight through the center of the pocket you want it in, and it going straight through the center of the 1-ball. Next, do the same with your cue ball. Where these 2 points meet is where you want to aim. See the image below for reference: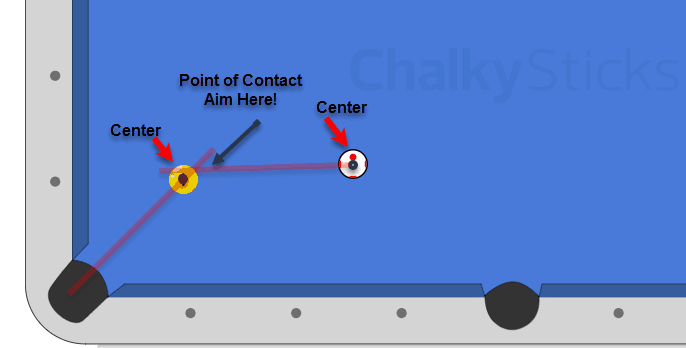
2. Ghost Ball Method
What also helps a lot of players to aim is by imaging a “ghost ball”. The ghost ball is meant to serve as the imaginary position the cue ball needs to be in order to strike the object ball and make it in.
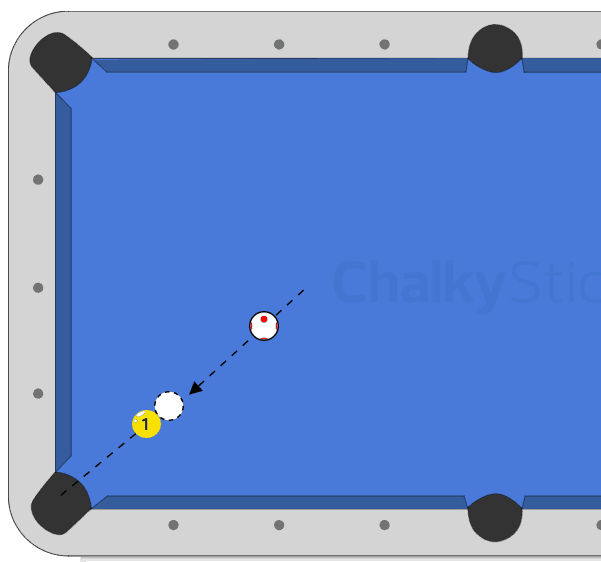
Now here in the example above, it’s pretty obvious where the ghost ball and aim point is:
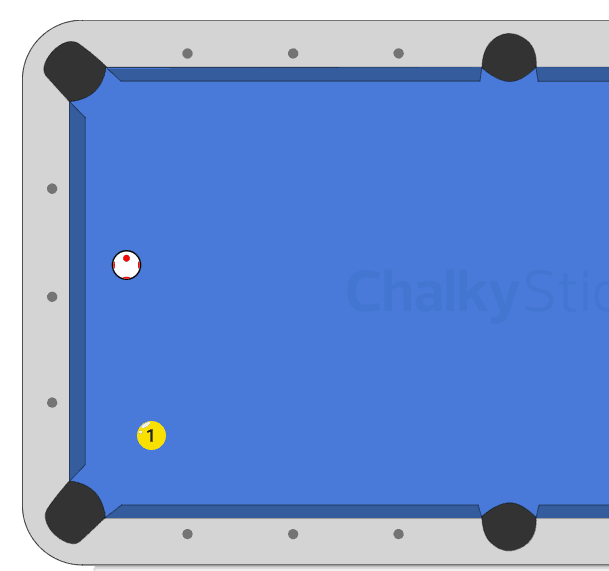
Now in the example here, it’s a little tougher. But remember what we just learned, finding the point of contact for the object ball (yellow 1-ball). The best way for me to remember is to imagine a line going right through the pocket and the 1-ball.
What helps a lot of players here too is they will hold their stick and line it up with the 1-ball and the pocket. This helps them easily remember where precisely to hit before getting down and aiming!

Once you’ve identified where the point of contact is – imagine a “Ghostball” like the one above striking where the point of contact is. If you can imagine your cue ball hitting exactly where the ghost ball is, it’ll help your aim and shot making skills a ton!
One last thing I want to mention about aiming is that there are several different types of “aiming” systems out there. If using the ghost ball technique or any other aiming system feels easier to you, stick with it. What people need to remember is that billiards is also a “you have to feel it” type of game. There will be things you learn and pick up that just feel “right” and feel “wrong”. Putting that perfect amount of energy or focus into certain shots versus the other or seeing the same patterns will start to come naturally to you over time.
Remember, if you don’t like one aiming system, feel free to try others. Here are a few examples of other aiming systems:
- CTE (Center-to-Edge)
- Parallel Aiming System
- Pivot Aiming System
3. Develop a strong pool stance
Having a good foundation for your pool stance is vital to your pool game. You want to make sure your foundation is strong so that if someone bumps into you by accident, you won’t fall over easily. The other important aspects are that you are aligned with your shot line, you have the clearance to get your strokes through and of course comfort.
Shot line = the imaginary line you are shooting on
One thing I want to first say is there is no “perfect” stance in my opinion. It is best that you use what is the most comfortable to use along with these best practices.
Example: Taller people usually bend both knees
Footing
Now to start you want your back foot (right foot if you are right-handed and vice versa) lined up with your shot line along with your grip hand. Next, players will walk into the shot with their left foot and get down on the shot. It’s okay if you do it differently as long as you end up with the same results.
The steps break down would be as follows:
- Identify the shotline where you need to shoot to make your ball
- Place your dominant (right foot for me) where you need to shoot
- Place your left foot a little forward with good distance between your right foot
- Get down on your shot
The distance between the feet – You want to make sure that there is some distance between your feet so that it is not too close or too far apart. One good way to measure the distance is to imitate the length of shoulder to shoulder so that your feet are that same distance apart.
Chin
Making sure your chin comes straight above your cue stick while aiming means that your aim is straight. Double check that you’re also lined up with your dominant eye too. Your head position should be right above your cue and low so you can get a really good vision of the cue ball and so you can see as much as possible for visual alignment.
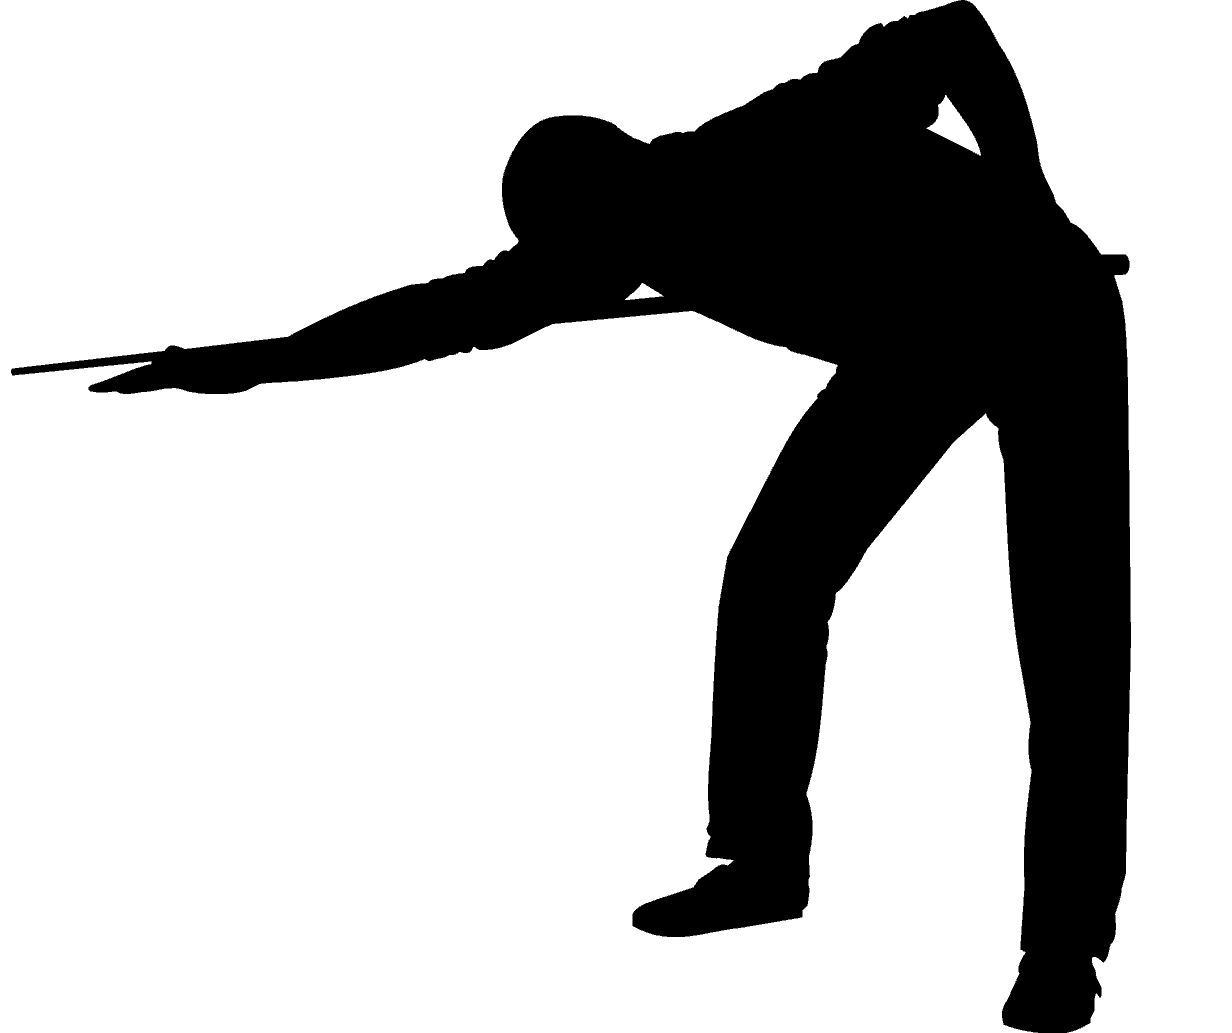
Above image: This is a classic pool stance. As you can see his head is low and above his cue. There is a good distance between his legs. Don’t worry about bending one knee and having one straight (this is normal too), but whatever feels most comfortable to you is what you should stick with.
Note: I personally don’t shoot with my head TOO low because it feels awkward to me. I like some distance from my chin to my cue (If I had to guess it would probably be 5 to 8 inches apart).
Hip Clearance
You want to make sure that when you are stroking back and forth for your shot, you are not hitting your body, hip, or any other body part while performing this. You want it to have plenty of space to swing and follow through to make your shot.
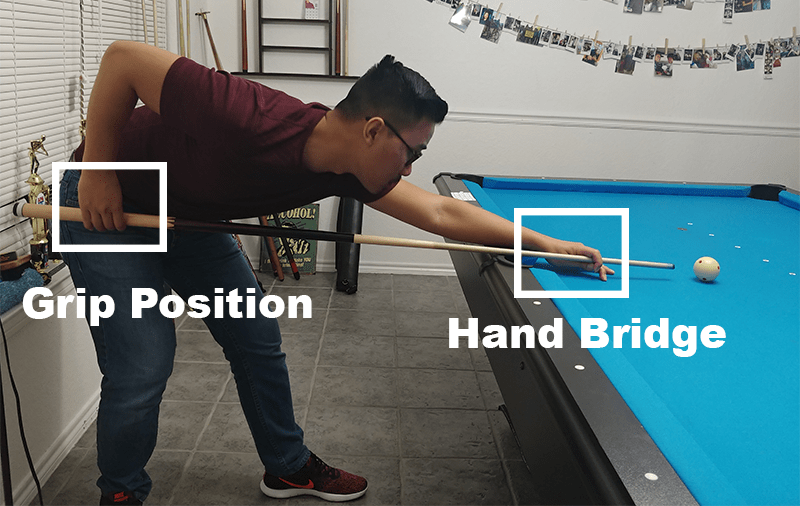
4. Stable Hand Bridge
How do I make a hand bridge for pool or billiards?
Having a stable hand bridge is so important because it is one of the two physical contact points you are making with your pool cue. There is a huge number of different hand bridges and it’s about what you are most comfortable with. Normally, a hand bridge consists of your less dominant hand placed on the table and pushing your fingers together to create a “bridge” that your pool cue can use to strike a ball.
You can stabilize this bridge by pushing together your thumb against your finger (index, middle or ring finger depending on an open/closed bridge).
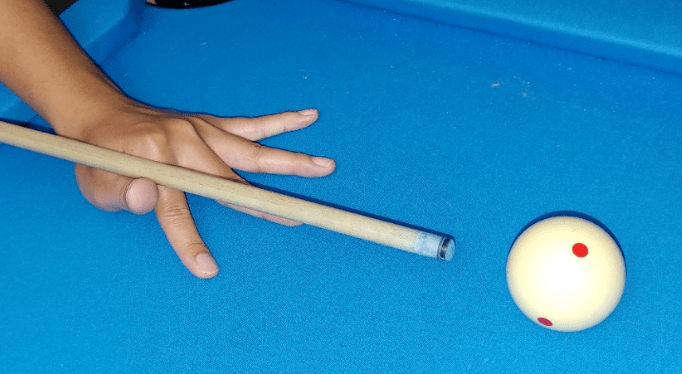
Example Above is an Open Bridge
I’m right handed so my left hand is my bridge hand. Here you can see my thumb is pushed against my index finger and my cue is placed on the “V” bridge I’ve created. Be sure to place the cue in between where your thumb and index finger meet, and not the meaty part of your thumb as this will cause more friction and resistance.
A few tips to keep in mind:
- The palm of your hand is usually resting on the table
- Place cue on “V” between your thumb & finger
- Stable bridge that is not easily moved
- Steady and not shaking
- Cue has a smooth stroke on your bridge without resistance
So I bet you’re wondering, well what are open and closed bridges? and how do I form them? Here is a link to my article over bridges specifically if you want to learn more: How do I make a hand bridge in Pool ?.
5. Your Pool Stroke is EVERYTHING
The stroke that you use will either limit or allow how far you can go in this game. It is a huge core of your skill that you need to master in order to advance further. The perfect pool stroke is referred to as the pendulum stroke because you let your elbow behave as a hinge and your hanging forearm as a pendulum. Make sure your grip isn’t too tight and your practice strokes are steady and your cue tip is getting as close to the cue ball as possible.
Remember, your warm-up strokes should be nice and smooth. You should be accelerating through your cue ball when your stroke and NOT jabbing it (unless necessary for the shot).
Tip! You should only be moving your forearm and not your shoulder or chest.
Read more about the stroke on my full post called How to Hold a Pool Stick (Grip, Stroke, and Bridge).
6. Always Chalk
Chalk before every shot!
I have probably miscued a shot over 100 times because I didn’t take the extra few seconds to merely chalk my tip before shooting my shot. This is so frustrating because in a game like pool where you must be precise, miscuing your shot is one of the biggest mistakes you can make.
My three favorite chalks are Master chalk, Diamond chalk, or Predator chalk. They are all good brands of chalk and are reliable. You will get into endless debates with some other pool folks as to which is better and which is worse – but honestly, they are all the same to me. Although if I had to come down to only 1 brand, it would have to be Predator Chalk. I have always been a big fan of predator products and they have never let me down.
P.S – if you need Hand chalk at home, stick to the old reliable Silver Cup. Here is where you can purchase it at Amazon.
7. Find Center
You need to make sure you are hitting the center of the ball when you intend to. I see a ton of new players think they are aiming in the “center” of the cue ball but they are actually striking a little left or right of the center! This is the biggest glass shattering effect a lot of players realize once they have identified this.
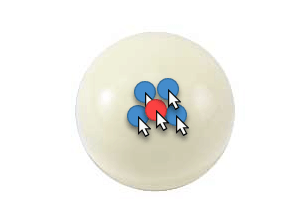
Believe it or not, many people will hit somewhere in one of the blue dots instead of hitting the center red dot! This means that even the slightest “spin” (left or right English) will deviate the cue ball and potentially make you miss! This is amplified much more on longer shots.
One of my favorite things to do is use a 6-dot cue ball which helps me with my aim. I position it where the red dot is the center and make sure I hit it square in the center for a few times. I’m personally a really big fan of routine, repetition, and drills – so I will line up a straight in shot with my 6-dot cue ball and make sure I hit the dead center for about 10-15 times. This is one of the basics I go back to when I am struggling with my game and it really helps.
8. Have confidence in yourself
I know this sounds corny, right? Sometimes you need to have blind confidence that you can make that hard shot, make that tight cut, bank the 8-ball to win the game and so forth. Without believing first that you are capable, there is no way you’ll improve.
The mind is one of the biggest weaknesses (and strengths) to your pool game. The mentality to stay calm, focused and with full confidence that the shot you are going for is going to be executed perfectly is crucial!! I have lost count of the number of times I’ve witnessed beginner players do worse when they feel nervous, shy or unconfident about their skills.
Stay positive, kill all your negative thoughts. Take a deep breath. You got this!
9. Stay down on your shot and don’t rush
Another big issue I see a lot of players have is that immediately after they shoot, they will get up, jump up or walk away from their shot too quickly. DON’T DO THIS!!! It is so important that player remains down while shooting because it keeps your stroke and cue straight and aimed towards your intended spot. When you jump up right after shooting (or IMMEDIATELY move after you completed your shot), a lot of players will accidentally veer off to the left or right and put Left or Right English (or spin) on their shot. This easily results in players missing their shots and being frustrated.
A good tip is after you are done shooting, stay DOWN and count to 3.
- Shoot your shot
- Count to 3! 1…2…3!
- Get up
This looks like a simple plan, but trust me it can be really hard and you will find yourself becoming more and more impatient with each shot. Sometimes I knock it down to 2 full seconds and I still get the same effect, but I want you to try it at least 5 or 6 times and you will notice a difference immediately. This will help you take your time from shot to shot and remain calmer too.
10. Practice and do drills
This should be an obvious one. Practice makes perfect. If you want to become a better pool player, get some time on the pool table. It’s important that if you are out and playing with your friends casually, this probably doesn’t count as practice. It needs to involve you thinking outside the box, playing different games like this below will help:
- Safety
- Carom
- One Pocket
My favorite drill is a simple one – The 3-ball Drill. Rules of the game:
- Throw out 3 balls
- Take ball in hand
- Hit them all in order
If you miss ANY shot, start over and decrease the number of balls you start with. In this next example pretend you started the 3-ball drill and missed your 2nd shot, then you would to now begin at 2 balls:
Throw out 2 balls and resume the game.
If you make all balls without missing and in order, start over but add 1 ball to your previous game. Try getting to 5 balls, then 6, then maybe even 9 or 10. It takes practice but this drill helps you with your ball pattern and ball selection. If you want to try different drills, there are a ton on youtube and out there on the internet. Get out there and complete those drills!
TIP TWIST! If you want to add a twist to the 3-ball drill. Add the rule where any shot you miss, mark that spot and try making it 3 times. Once you’ve made the shot 3 times, you can go back to the 3-ball drill.
11. Learn how to break!
Breaking is very important, it starts the tempo of how the game is going to go. These few tips are recommended when practicing your break:
- Place the cue ball in the center of the table and hit CENTER. We want to keep it simple and not try any crazy angles.
- Follow through with your break so your stick extends pretty far out
- Try to keep the cue ball in the Center of the table after breaking, this is the ideal position
If you want to learn more about breaking, check out my full post here called 5 Tips for Breaking the Rack!
Conclusion
If you are still struggling with your pool stance, have a friend take a few pictures of you while you are shooting. Make sure that they are from different angles so you have a variety of images. Then compare your picture to the one above. You can even do this at home if you have your own stick and want to pretend you are getting down on a shot and use a table or counter at home for a reference.
My last unlisted tip is… Don’t give up! Billiards/pool is an incredibly hard game to excel at when you think about all the different factors that go into it. All the pro players started as beginners and if you want to know how to practice like a pro, these tips are a part of that building block.